

Which one to use
Connecting from code is the recommended path: the process that already runs your agent connects itself, and there is no URL, no request template and no credential in the agent configuration. Use one of the paths below when that is not possible.HTTP agents
The platform calls your endpoint once per conversation turn, from the LangWatch backend, and reads the reply text out of the response.1. Expose an endpoint LangWatch can reach
A staging deployment is the recommended target: it exercises the real system without touching production data. Any URL the backend can reach works; an internal hostname or a firewalled service does not. The endpoint does not need to know anything about LangWatch. The request body and the response parsing are configured on the LangWatch side, in step 3.2. Authenticate the scenario traffic
Your endpoint’s existing authentication passes through the HTTP agent’s header rows and itsauth block (bearer, api_key or basic). Store the credential as a project secret and reference it as {{ secrets.NAME }}, so it stays encrypted at rest instead of readable in the agent’s configuration.
When the normal authentication is built for human users (sessions, OAuth redirects), add a dedicated API key for scenario traffic instead: your server reads the expected key from an environment variable and checks it on each request, and the HTTP agent sends it from a secret. A dedicated key is also the one you revoke to close the testing path.
Also check: Testing agents behind authentication lists
exactly which fields resolve secret references, and covers an OAuth2 client-credentials exchange.
3. Define the request and the response contract
The body template renders as a Liquid template on every turn, andoutputPath is a JSONPath expression that picks the reply text out of the response.
Body template
The URL and the header values render the same variables.
For the response, set
outputPath to the JSONPath of the reply text. If the endpoint answers {"reply": "It ships on Tuesday."}, set outputPath to $.reply. The platform reads the reply text at that path; the response needs no other fields.
Keep a value between turns
Many agents create their own conversation on their side and cannot accept an id from outside.sessionPath covers that: a JSONPath to a value in the response that the platform keeps for the conversation and sends back as {{ session }} on the next turn, in the URL, the headers and the body.
If the endpoint answers {"reply": "...", "conversation_id": "conv_8f2"}, set sessionPath to $.conversation_id and read it back from the body template:
Body template
{{ session }} as an empty string. A response with no value at the path keeps the value from the previous turn. Any JSON value works: a string renders as text, an object or a list renders as raw JSON. The value is capped at 64 KB; a larger one fails the turn with agent_payload_too_large.
An object or a list goes in the body without quotes. Give it a JSON value for the first turn with the default filter, or the body is not valid JSON before the endpoint has answered once:
Body template with an object session
4. Adopt the trace context
The platform sends a W3Ctraceparent header on every call, one trace per conversation turn. When your server adopts it, the spans your agent produces land in that same trace, and the judge reads them before its verdict: tool calls, database writes, retrievals.
This step belongs to HTTP agents only. A connected agent adopts the context inside the SDK, with no middleware.
With standard OpenTelemetry HTTP auto-instrumentation, adoption already happens and you keep the code unchanged. Without it, attach the extracted context in a middleware that runs before any tracing starts. Do not extract inside the handler body: a handler decorated with @langwatch.trace() opens its root span before the body runs, so an extraction there comes too late and the agent’s spans land in a separate trace.
- Python
- TypeScript
before_request (keep the token on g) and detach in teardown_request.5. Register the agent and run
In the platform, create the agent on the Agents page: type HTTP, then the URL, authentication, body template and output path from the steps above.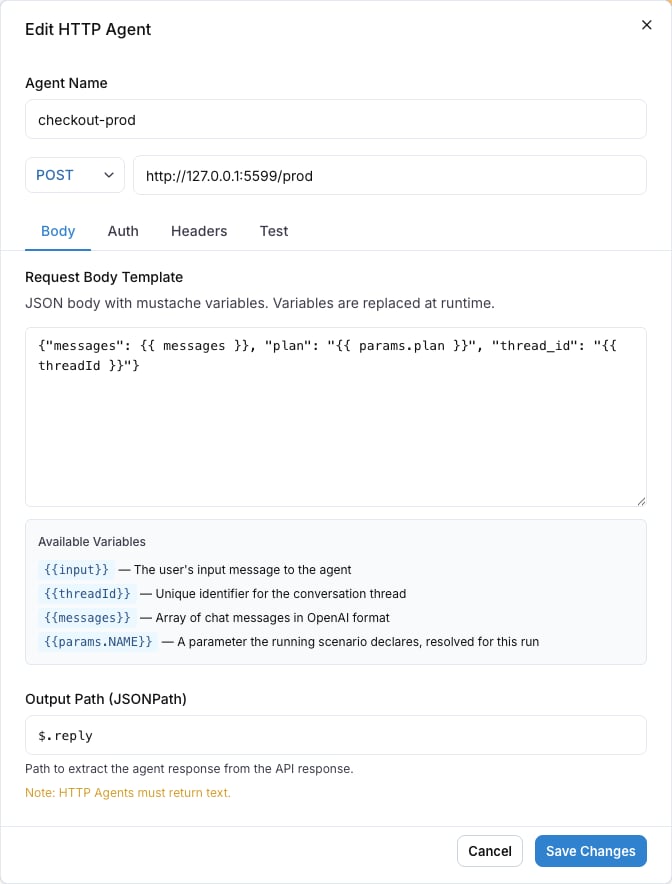
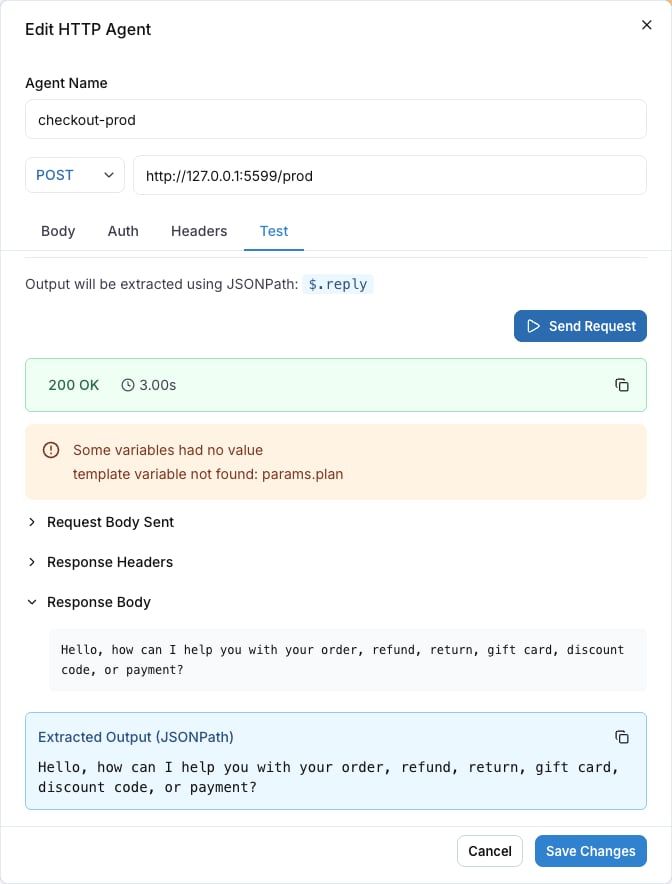
sessionPath is optional; leave it out when the endpoint keeps no value between turns.
Common failures
A local HTTP agent: langwatch agent tunnel
langwatch agent tunnel starts a tunnel in front of a local port, points a registered HTTP agent’s URL at the tunnel, and restores the previous URL when you stop it with Ctrl-C. While it runs, every scenario run against that agent calls straight into the process on your machine.
A connected agent needs none of this: it reaches out from your machine, so a local process is a target with no tunnel and no URL rewrite. agent tunnel is for HTTP agents.
--agent flag, the command lists the project’s HTTP agents to pick from, and remembers the choice per project directory in ~/.langwatch/config.json. langwatch agent dev is an alias for the same command.
How the tunnel is protected
The tunnel URL is public, and your local agent process usually holds real model provider keys.langwatch agent tunnel mints a per-session secret, fronts your local port with a proxy that rejects any request missing the X-LangWatch-Dev-Secret header, and writes that header onto the agent’s configuration for the session. Only the platform’s scenario calls send the secret. On exit, the command removes both the proxy and the header row.
--no-auth turns the proxy off, for a server that already authenticates every request. A bring-your-own tunnel (--tunnel-url) also runs without the proxy, so that tunnel endpoint must supply its own access control. The agent’s own configured authentication headers pass through the tunnel unchanged either way.
While the tunnel is up, the agents list and the run target selector show a local tunnel badge on the repointed agent, so the team sees that the agent points at a developer machine.
Limits
The default transport is a Cloudflare quick tunnel ontrycloudflare.com. The command shows Cloudflare’s terms notice on the first run.
- Quick tunnels have no availability guarantee. Use them for the development loop, and run the test suites you rely on against a deployed URL.
- Quick tunnels buffer server-sent events. This does not affect scenario calls, which are plain JSON requests; it only affects a streaming endpoint served through the same tunnel.
- Quick tunnels cap at around 200 concurrent requests.
--tunnel-url swaps in your own tunnel when you hit these limits.
A crash or a kill signal the process cannot catch skips the restore, and the agent keeps pointing at a dead tunnel. Calls to it then fail with an error saying the tunnel session probably ended, and the local tunnel badge stays visible. Run langwatch agent tunnel again to take the agent over with a fresh tunnel, or set the agent’s URL back by hand in the agent editor.
Code agents
A code agent is a small piece of Python stored in the agent configuration and executed by the platform. It reads the project’s secrets as an injectedsecrets namespace and the run’s values as params, and returns the reply under a declared output key.
It fits a target that is glue and no more than glue: a token exchange in front of an API, or a call into a service that has no repository of its own. It does not run your product’s code, its dependencies or its secrets, so it is not the way to test a real agent. Use connecting from code for that.
missing_output. Run it with --target code:<agent-id>.
Keep a value between turns
A code agent can keep one value per conversation. Return asession key beside the output, and the platform sends it back on the next turn of the same conversation. To receive it, declare an input (here session) and map it to the scenario source session in the agent’s scenario mappings; an input named session is mapped to it by default.
None on the first turn of a conversation, and afterwards exactly the value the code returned, with its JSON types: a dict stays a dict, a string stays a string. session needs no declared output. A turn that returns no session key keeps the previous value. The value is capped at 64 KB; a larger one fails the turn with agent_payload_too_large.
Testing agents behind authentication has the worked OAuth2 client-credentials example, the secret rules and the runtime’s limits.
Next steps
Connect your agent
Call your agent from a connect function beside your service startup
Authenticated agents
Reference project secrets, and exchange OAuth2 credentials
Linking your traces
What the judge reads from your agent’s own spans
Command line interface
Every agent and run command, and its flags